Sunday, August 31, 2014

Back to Our House

Now that I had the basic concept, all I had to do was find the space. Where art thou, space? The kid’s bedrooms were filled to the gills. Not an inch to spare. Hallway too narrow and the guest bedroom/my office had more than enough furniture and bookcases. I was frustrated.
 
As I sat at my desk and stared our the door, in my view was the lacy white curtains that concealed two wide openings to the linen closet, however, the closet did not have one iota of linen. There was a mattress & box spring, boxes of holiday decorations, construction material, window screens, tools - you get the picture. The closet was quite commodious. It ran the length of the back hall - about fourteen feet. It was four feet deep and nine feet high. Here again, it was an unfinished part of the house. The closet ceiling had a trap door that opened into the attic. We thought of putting the back stairway in this space but it never came to fruition.
 
Pulling back the curtains, I took a big sigh and asked myself, “Now what do I do with these things? Where will I put the mattress? Decorations?” All of a sudden, it sadly dawned on me that regardless of the fact my house was large, there was very little storage besides the attic and now that was off the grid. I could put some of the things down in the basement, like the construction stuff, but certainly not the mattress. With my storage options exhausted, I was ready to give up on our family museum.

As I finished up in the laundry, so conveniently located next to my office – no getting away from that chore – I needed to get out the vacuum cleaner stored in the tiny area behind the laundry room, which housed the dryer hose and vent, plumbing pipes and electrical wiring.
 
When my husband built our house, all unused space was noted, especially the area under the eaves (the part of a roof that projects beyond the wall that supports it - attic or roof), which is wasted space. Just think about how much of it can be used for storage. Many new and old houses have this space and it can be obtained by putting in a door, laying down some flooring, insulting and lighting it. Voila! Storage space. Maybe not much space, nevertheless, space. After I measured it and installed some simple shelving, I was not only able to move all those Christmas boxes, I had a place to but the mattress and box spring. That freed up the space in the so-called linen closet that now became Our Family Museum. Boy, was I thrilled.

So here I am, staring in front of this empty space - a linen closet 4 ft. wide  x 14 ft. long. Two open spaces for double doors and an air vent located in the center of the ceiling. Tan colored linoleum covered the floor. That was doable. The walls were that yucky builders' off-white that had to be changed. But what color? And what kind of doors? We decided standard French doors with windows for viewing and would keep items safe and fairly dust-free. Lighting, which is paramount for display, was already installed. Not desirable, but it would do for now.

Meanwhile, on the floor in the hallway, my office, the bedrooms, even the bathrooms, stacks of boxes held the things I wanted to put into the Family Museum and I hadn't the foggiest idea where to begin. Then a cry of anguish echoed down the hall. My husband Keith stubbed his toes on a stack of boxes, almost knocking them all down. Hobbling over to me, we stood their together starring into the empty closet. Pulling out his tape measure, he sighed, "Well I guess it is time to build the shelves." And so he did . . .   

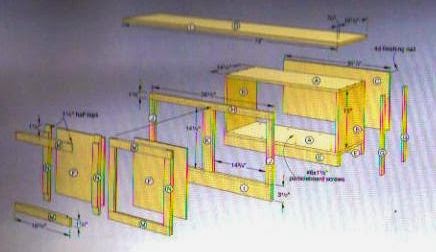
On the weekends, during the evenings, on days off and then some, Keith built the shelves. Using plywood left over from our house construction, he measured twice, cut once, and created the shelves for our Family Museum.

After he installed all the shelves for both sides; one was for our things, the other side for the kids, I painted the back walls purple and the shelves a creamy white. I made a curtain (I chose a dark color with a little sparkle for an artistic touch) and attached them on a tension rod. Under the large counter I placed some pre-fabricated book shelves, giving me much needed storage space.

Now it was time to select and display the items. 

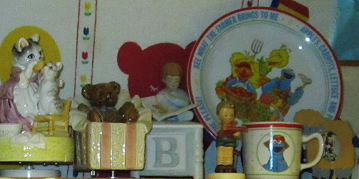
At first it was a daunting job. I wasn't sure where to begin. Then as I was taking things out of the boxes and putting them into distinctive piles - his, mine, ours - I found two items of my husbands that were almost identical to the two items I had when we were babies: a toy and book. I place them in the center, his to the left, mine to the right, which designated the two collections. From there, everything that was mine went on my side and his on the left side. And since the first things were from our childhood, I went with that idea of doing a chronological display. With having four shelves, it was like creating a timeline of our lives displaying the things that we played with, things from our school days, careers, and so on. I could not believe how everything started to fall in place. I will go into more detail about how the things were displayed and the challenges I had in doing so.

After the museum was filled, we  installed the doors and Keith did some fancy trim work. Then he made a colorful sign and hung it between the sets of doors. This establish the once lowly linen closet into
Our Family Museum.

Even after having the museum for several years, my family and I still can't believe we have such a place in our home. And when guests come over and we take them to see our museum, they are all surprised and impressed.
They could not believe how wonderful it was to have our family memorabilia, heirlooms, collectables, and other precious items so beautifully displayed as well as safe & secure. 

That is what having a Family Museum in your home is all about.

Next Post: Why we celebrate Labor Day


Saturday, August 30, 2014

Our "Family Museum" Story

One day my dear friend Barbie accompanied me to the attic. As I rearranged once again stacks of boxes to make room for more, she laughed when she spotted a box labeled,
    "Charlie’s Memorabilia"
She asked, “How could Charlie already have a box of memorabilia when he is only two years old?” Laughing, I said, “Open it.” 

She did and was surprised to see I had saved not only the usual
baby shoes, she saw his teething ring, a tiny box with his baby teeth, first tiny diaper, Christening gown, rattles and photographs. As she closed the box, I could see a melancholy expression on her face. She said softly, “I kept Christy’s baby shoes but not Ryan’s. I never thought to keep the things you did.” Then she laughed. “And baby teeth! Ryan swallowed his and I think my grandmother kept some of Christy’s, but their gone now.”

Handing the box back to me, she asked, “What are you going to do with all this stuff you are saving?” Feeling overwhelmed as I gazed upon the stacked boxes, I was not at all sure what to do. A couple of years later, push came to shove and I had to do something about all those boxes.  

My father had a stroke and my mother was terrified of taking care of him herself.  

After much soul-searching, my husband, Keith, and our kids Tiffeni & Charlie
offered to turn the attic into an apartment for them. Because Keith built our home, some areas were still a work-in-progress, particularly the front hall. We did not know what style staircase we wanted, so we did not build it since there was one in the kitchen. Because there were no stairs in the hall, we installed an elevator for my father who now had to be in a wheelchair.
 
When finished, the attic became a private two-bedroom, handicap bathroom, full kitchen and a living/dining room apartment. It was quite commodious and with the ease of the elevator, dad was able to ride it down to the basement where we had set up a workshop filled with all his tools and gadgets so he could entertain himself.
 
So what happened to all those boxes? It was a conundrum. We piled the boxes in the guest bedroom, which was also my office. We piled boxes in the kids bedrooms, hallway and laundry room. As we placed these cubicles of souvenirs’ into stacks, I looked into each box to see what exactly was in it. Oh my goodness! Talk about memories. Each of us was stunned to see stuff we thought long gone and were thrilled to see again. I will not describe here all the emotions displayed, but rest assured there were plenty. So what did we do next? Organize! 
 
As we opened a box and saw what was in it and to whom the stuff belonged, we put the box in that person’s room and labeled it with their name and description of the contents. This was the best time to consider what were the most important things to continue saving. Box-by-box everyone had a hand in creating their own preservation. But what to do after we organized it all was still a dilemma. Then I got a clue by way of a very unexpected discovery.
 
One day Tiffeni and I took a trip offered by the Chrysler Museum to the Reynolda House Museum of American Art in Winston-Salem, North Caroline. Built in 1917 by Katharine Smith 
Reynolds and her husband R.J. Reynolds, founder of the R.J. Reynolds Tobacco Company, the home displayed a premiere collection of American art ranging from the colonial period to the present. The museum had restored interior rooms and furnishings to reflect the periods when the family lived there. Reynolda House features a gallery space for traveling exhibitions. There are usually two shows featured in that space every year, one in the fall and one in the spring.
 
There are other exhibitions throughout the year in the Northeast and West Bedrooms in the house. Not only in the bedrooms but in the attic where a wide hallway was lined with glassed-in mini rooms that displayed delightful items, from
clothing to jewelry, sports equipment, toys, music, photographs and more.
 
That is when I came up with the idea of a family museum. If the Reynolda family can take areas in their home to display their precious memorabilia, then so could my family! 

                                        
Next Post: Back to Our House


Friday, August 29, 2014

WHERE TO BEGIN

We hold onto our possessions because we believe they are important – to ourselves, to others, to our family, to our heirs, to our own personal story. If these items are supposedly so important, the question is how are you treating them? If you value an item, then show it off. Honor the memory by displaying and celebrating the item. The respect you show will result in the heirloom having a new meaning and value to you today. Your things did not mean much when they were stuffed in a drawer or box, but after you create your family museum, they will now add real value to your life because they celebrate your family’s history.
                        
                        Here are five steps on where to begin . . . .
  
First Step – STOP throwing or giving your memories away! There is much psychology today behind why people save or don’t save. We all accumulate things, throw some way, and keep others. We might save for example our first report cards and love letters. When choosing items you want to put in your family museum, be selective, be discriminating. My basic museum principle is select only what you and your family truly cherish. Identify special mementos. Appreciate quality, not quantity.
            

Second Step – MAKE lists of important times and favorite things. Remember, emotions will influence your choices. Celebrations, accomplishments, occasions, people, places visited, etc. Under each category, list, for example:
Personal Celebrations – birthday, anniversary, holiday, graduations; Accomplishments – awards, trophies, certificates of achievement; Occasions – holiday presents, special outfit or costume; People – photographs of relatives & friends, school yearbooks; Places Visited – family vacations and reunions, class trips.
 
 
Third Step – RECALL if you saved any of these things, where they may be, who may have kept them over the years. Everyone saves things, not only theirs but yours, too. Check with grandparents, aunts & uncles, brothers & sisters, friends.

Fourth Step – SPACE. Finding it in your home can be a challenge. But don’t despair! There are many options to display and store your family’s cherished 
possessions. The main objective is to create a place for all family members to enjoy.

Fifth Step  –  CREATE. Your museum is a cooperative venture. Assemblage of the various items is an artistic endeavor. The arrangement of these items is enterprising and every earnest attempt and cooperation needs consideration. Gather a diversified assortment from various people (family, friends), places (lived, visited) to form a wide spectrum of history. Select & mix or variety is the spice of life!

Your museum is a healthy way to build family closeness in the present and for the future. Perhaps you ask, why cling to the past? I prefer embrace. Emotional attachment is not a bad thing.

Your museum highlights your family’s beliefs, traditions and life stages. It is good and wise to retain as many of your recollections as possible,  especially if and when you can no longer see or give a hug to that person. So hang on, hold on, to the memories.

"Keep some souvenirs of your past, or how will you ever prove it wasn't all a dream?"   Ashleigh Brilliant, Author & Cartoonist

Next Post: Our "Family Museum" Story
 

Thursday, August 28, 2014

HOW TO ORGANIZE YOUR HEIRLOOMS: FINDING, SELECTING, DISPLAYING

 
As this last week and weekend of summer comes and goes, I will be writing about a new installment for my Blog spot. Therefore, to give myself some much needed time to write and research, the next four posts follows, "Reintroducing How to Create a Family Museum."
Sometimes it is good to review because, as I have found myself, I had missed something the first time I read it or watched it. Better to do it again rather than never have done it at all.  


The key word is organization - one box at a time. It is overwhelming at first, but as they say, "Rome wasn't built in a day."

The finding is the easy part. It's all there; just look and you will find it. And as you do, you will be surprised at the things that were saved for one reason or another. For instance, my husband saved all of his naval uniforms. Why? It's not as if he was going to mop the deck anytime in the future. And he was so skinny thirty-five years ago! So out of that collection he picked his navy hats and the photograph of himself when he made Chief Petty Officer.

The selecting part takes time.
Picking the items out, deciding between one or more of the heirlooms, dividing the space equally, and sometimes having to draw the line as to who gets to put what where and how many. When it came to my Barbie dolls, I wanted to put all of them into the museum, along with their kitchen set and dress case. Woe was me to have to select. But I did. And I got it all in and still had room for more.

There is an art to display. Look at a large museum's intimate collections, department store windows, or antique shops. The space you have will dictate how you will display your heirlooms. Organize items in groups. The main idea is to express through display the meaning behind the person, place, thing and event. You want to invite your guests to look closely at your collections, to touch them, encouraging them to ask questions so you can tell your stories.

However you go about putting your family museum together, find, select and display a good cross section of heirlooms because variety is the spice of life.

     "Any color, so long as it's red, is the color that suits me best,
       though I will allow there is much to be said for yellow and
       green and the rest."                   Eugene Field


Next Post: Where to Begin


Wednesday, August 27, 2014

Conservation/Preservation

Cataloging, Storage & Maintenance
                                                    
Heirlooms, antiques, collectibles, keepsakes . . . all of them have different values, monetary as well as aesthetic. Our homes and our lives are filled with things. Some are more important then others. Some are more valued then others.
Once you have selected the artifacts to display in
Your Family Museum, which is a conservation project in itself, those placed in storage will be preserved, catalogued and maintained. Here is a guide for you to become acquainted with archival terms to assist you in this endeavor.
        
Conservation protects, manages the cares of valued artifacts,
    collections, heirlooms, etc.
Preservation keeps precious items from change, loss or damage.
Cataloging is making a complete list of all the items displayed
    and in storage, arranged in alphabetical or other systematic order.
    Account ledgers are efficient books in which to log, make
    entries, document, classify, list, index, categorize, sort and divide
    inventory. Keep this information (in hard copy placed in a
    fireproof box and on a computer disc) for the very intent and
    reason for cataloging. By implementing a filing system, it will
    help you create your archive collection.

Archive is a collection of historical
    documents or records. We all have archives
    of one sort or another: notebooks,
    scrapbooks, family albums, journals, diaries,
    or account books. These bits and pieces of
    recorded dates, places and events are
    extremely helpful as you assemble your
    displays.
You may even become an Archivist – one who keeps records that have enduring value as reliable memories of your family’s past, which will provide an acute understanding of your family’s history. When you do this, you are establishing provenance.

Provenance is the history & ownership of the item(s) origination.
Restoration is the repair & renovation to keep all in a good condition.
 

Storage is the space available for saving 
    and keeping family treasurers. There are
    many types of storage units, some
    specific to size and shape of the item:
    map chests, filing cabinets & archival acid-free boxes for storing valuable photographs, artwork, or documents and precious items such as maps, prints newspapers.

A plethora of websites will help you to investigate, compare and learn about the many ways to protect your property. You need to consider the space your unit(s) will require, temperature, lighting, accessibility and safety.
      
Once Your Family Museum is complete, your archives created and the preservation, storage and maintenance in place, you can take pride in a job well done and take comfort in the knowledge that your family’s keepsakes, collections, antiques, and other precious items are no longer obscure and forgotten. Your family museum(s) will be a continuous record of past events, present acquisitions, and sets in motion the preservation of future experiences.


Tuesday, August 26, 2014

Any Room/Space

Custom-built Units

A disadvantage in using bookcases, curio cabinets and coffee tables for family museums is space limitation. Clothing or large items cannot be displayed properly. However, these items can be best displayed in custom-built units. First, determine both the size of the items and the collection as a whole. (Remember selection is encouragd). Then assess the room's space, traffic pattern and furniture arrangements. Once the space is determined, make a sketch or find pictures (many online) of what type of unit  you have in mind. Allow room for pieces that are large, such as a child’s wagon or dollhouse. Arrange the shelving (adjustable shelves add versatility) to accommodate tall items. If clothing is displayed, such as a wedding gown or military uniform, allow enough room  to provide space for the dress form (if you should use one). I did not employ any dress forms for the Keith’s leisure suit or my Dynasty Suite. I used strong gift boxes (ones for sweaters). There are a few other tricks to make the clothing displays work (I will fill you in on later).
 
Modular wall systems are very popular. The best units are often a mixture of display and storage. Equipped with adjustable shelving, cabinets, drawers, with glass front doors and other specialty options, these freestanding boxes and cubes can be stacked and rotated atop one another, giving you ample ways to display and store your heirlooms while organizing a myriad of objects associated with collections. They can work independently or in groups, depending on the size of your need and the space you have.

Built-ins work where a piece of furniture or a modular wall system cannot fit, allowing you to tailor the space precisely to your needs.
For example, within a thick wall, under a staircase, over a doorway and around windows. Though some pre-made cabinetry can be fitted to look built-in, they are better customized to your specifications by a cabinet-maker or finish carpenter. The prices vary depending on size, materials, complexity of the design, and labor. They are well suited to odd size items that need odd size space and save on valuable floor space. 

Pay close attention to the shelves back wall, where you can hang photographs, plates, even small items of clothing. Styrofoam blocks (found in craft stores) are good for building height. Step-layering shelves adds display space and dimension. By grouping interrelated items together, it makes a cohesive display. Arrange by age (baby) or time (school years) or hobby interests. Cluster a specific collection to tell a story. Just as in a museum, the display conveys an historical era or epoch, allowing the viewer to see a bigger picture of who, when, and how the person, place or thing came about and contributed to the family history.

I advise leaving a good portion of space under the top shelf for storage. Install curtains or doors over this area to conceal other items or the remainder of your heirlooms. You don’t have to display everything. One or two of a particular subject matter is sufficient, storing the rest. If you desire to change that display, those other items are in easy reach. The curtain also enhances the museum’s look.
 
Get the entire family involved with the project. You will be surprised at some of the suggestions they will make. Keep an open mind and Your Family Museum will be fun for everyone.

Next Post: Conservation/Preservation


Monday, August 25, 2014

Closets & Shelving

Find a closet that is not already filled to the gills? An extra closet? I have to be kidding. Right? Well, I thought the same way. My closet space was minimal and stuffed to the maximum. After I brought down everything from the attic, the boxes lived in the hallway for weeks. It was a daunting task to divide and conquer, and to find everything a place and a place for it all. My toes begged me to do something about it after they suffered numerous collisions with the boxes.

The trick about taking an overstuffed closet and turning it into display space for your family museum is having some kind of space to transfer the closet’s paraphernalia. To meet the demands of both ample closet space and sufficient space for display purposes, invest in shelving, wall cabinets and/or module closet systems. All offer many options and designs for the closet space to be configured and adapted into a display unit. Custom-built shelves can be placed in other rooms: laundry, bathroom, other closets, the basement, attic, and the garage for storage.
           
Linen closets make the best space for a museum because they already have shelves and lighting. After you cleared it out, if the shelves are wire, replace them with solid shelving boards. Replace standard sliding closet doors with decorative interior or bi-fold French glass doors. This allows for viewing and the light from within illuminates the hallway. 

By combining form and function with extraordinary design, reach-in and walk-in closets can be transformed into an organized display and storage of family heirlooms instead of a dysfunctional space. Where ever you create your family museum, it will be an inspiring and gorgeous space that will bring a visually stunning and timeless beauty to your home. 

And don’t forget to hang a sign embellished with Your (Family Name) Museum.


Next Post: Any Room/Space with Custom-built Units

Sunday, August 24, 2014

Child(ren's) Bedroom(s)

Many Ideas

There is nothing more satisfying then when a parent goes into a child’s bedroom and can see the floor. Trying to keep their room orderly is a monumental task. Trying to instill the merit of a neat room is just as difficult. There really is not a sure way to get them to do either. But one thing you can get kids to do is to show off their hobbies, collections and interests. A great way to do this is by having them create Their Own Museum. If closet space is not an option, here are several creative ways. First, ask your child how he or she envisions their museum. Get them involved and the whole family will have fun.
 
Factory-made mullion glass-fronted wall cabinets with solid or glass shelves (seen in photo) – such as those found in a kitchen – is an option to consider when planning built-in display & storage for the child’s room or any room in your home. Ceiling height determines how high to place the cabinets, but do not put it up to the ceiling. Make sure the lighting in the cabinets are ventilated. If you cannot do the job yourself, where you purchase the cabinets, they can recommend a carpenter. By having the museum in this fashion, bedroom furniture can be pushed up against the wall making floor space available. Sold through cabinet dealers and home-improvement centers, manufactured cabinets come in many styles. There are three configurations: base, wall, and specialty cabinets. You can place them side-by-side and stack them to create all sizes of family museums. Space allotment will dictate how many cabinets you can use and whether you can place them on the floor or need to hang them on the wall.
    
Another area to display large objects, like model boats that can take up a lot of space, is by putting them on the top of a window valance. Not only does this put them in a regal realm, it keeps them out of harms way. The valance also is great at concealing the top of draperies, curtains, and window shades. By constructing a wooden valance (a trim carpenter can scallop the edge for a more decorative look) with a solid top, is a perfect place for displays. For example, my son has a collection of large ship models, even a three-foot long Titanic. There is also The Queen Mary I & II, and aircraft carrier USS Independence.


Dormer windows are under-estimated. Though it usually is a place for a window seat, this is really a great place to showcase a particular item or items, and the space below can be used for storage. If the dormer space is large and accommodates more than one window, the space can be separated in sections, devoting, say a collection of dolls & furniture, dollhouses, large toys like rocking horses, baby dolls with their prams, etc., into their own display. This area can also be enhanced with low-watt lighting. If you install glass doors, remember ventilation.  
Once your child/children organize their keepsakes, they will have a great time displaying & showing their collections to friends and family. Their Own Museum identifies them, their accomplishments, instills pride and contributes to the goal of building a future viable resume.
 
Next Post: Closets & Shelving

Saturday, August 23, 2014

Your Family Museum in a Guest Bedroom & Home Office

Guest Bedroom
Curio Cabinets
                                                                                                                                                                 
The empty bedroom. For whatever reason the room is not occupied, then why not occupy it with Your Family Museum. There are several ways you can accomplish this. The room’s purpose, usefulness and size will be your guide when choosing a curio cabinets to display your heirlooms. They can be petite or grand. They can go in the corner of a room or by using several cabinets, they can take up a whole wall. Yet, as small as some curio cabinets can be, they are nevertheless a great place to showcase a collection. Curio cabinets make excellent Family Museums.
 

There are several styles of curio cabinets available at furniture stores and online. You can also have one custom-built to meet your specific requirements based on the objects to be displayed. Most curio cabinets come with lighting, glass shelves and beveled glass doors. One challenge about glass shelves is some may not be provided with a groove to support dishes. This is easily remedied by using clear museum gel, a clear removable adhesive that secures not only dishes but also any object that may be vulnerable to falling. You can also purchase small plate stands. Bookends are good for all support needs. For a thoughtful touch, place a photograph by the heirloom of the person to whom the heirloom belonged which defines and associates the item with the person and adds more interest.
         
For more ideas, visit a museum. Take a look at the smaller exhibits of artifacts displayed. Due to the massive security museums employ, these diminutive collections are sealed in glass-enclosed chambers. Not much different from a curio cabinet except, of course, you cannot open the glass doors and take the heirloom out anytime you please. However, you can in your museum. Also, antique shops do an admirable job displaying a plethora of items. These displays will show you how unrelated items can work together. Be creative. Have fun.

Once your curio cabinet is filled and you show your guests the objects displayed there, refer to the cabinet as Your Family Museum. That always sparks their interest. You can even apply a small brass plaque identifying the museum. For example,
Grandmother’s Collection of China Dolls, circa 1890
After your museum is completed, what a pleasure it will be when you walk into that bedroom and no longer feel loneliness there. And what a delight it will be for your guests. The museum will be a great way to introduce them to your family and encourage conversations. You may even stimulate them to create their own family museum.

Home Office
Bookcases

More than ever, today’s workplaces are at home. What a great place this can be for your own Personal Museum of Success, dedicated to the occupants’ career or profession.
The size of the type of occupation will determine the area. You want to allow enough space to accommodate the memorabilia collected over the years that showcase the stages of a career, such as significant tools of their trade, books, and military items if service to our country was performed.

For example, after my husband retired from the Naval Reserves, he was presented with a large American Flag. He did not want to keep it folded up and in the display box, so he hung it on the wall. His Certificate of Honorable Discharge hangs above his desk.

Other items such as photographs of special people and events, licenses, framed certificates(s), letters of acknowledgment, cherished books, keepsakes from past offices and colleagues, all the important things that led to his or her success. The home office is also a great place to display trophies. After the Personal Museum of Success is completed, the occupant of the home office will have a feeling of accomplishment. Taking pride in ones' attainments solidifies his or hers success, skills, achievements. What better way is there to start the workday with a gentle reminder of something well done. And at the close of the day, an affirmation of the same.

Next Post: In the Hallway & On the Walls Museum

 
P.S.
Here is an image of the 'Museum Gel"
I mentioned in this post. It is very useful
and easy to use. You can find it any any
office supply store or building center.
Online, too.